
Salesforce Data Migration Checklist: Everything You Need Know
.webp?v=2.1.3)
The Cost of a Failed Salesforce Data Migration
A failed Salesforce data migration can result in:
20–80+ hours of rework to fix data mapping, validation, and import errors.
100% disruption to reports and dashboards until data is corrected.
Thousands of duplicate or inaccurate records affecting CRM reliability.
Hundreds of failed imports caused by validation rules, missing required fields, or incorrect field mappings.
Days or even weeks of delayed CRM go-live, impacting business operations.
According to Forrester (2023), more than one-quarter of organizations estimate they lose over USD 5 million annually due to poor data quality, while 7% report losses exceeding USD 25 million.
A 2025 IBM Institute for Business Value (IBV) report found that 43% of Chief Operations Officers (COOs) identify data quality as their highest data priority.
Together, these findings highlight why careful planning, data validation, and quality checks are essential for a successful Salesforce data migration.
Moving business data into Salesforce is one of the most important steps in a CRM implementation project. Whether you are migrating from HubSpot, Zoho CRM, Microsoft Dynamics, Pipedrive, spreadsheets, or another database system, the quality of your migration directly affects Salesforce performance, reporting accuracy, automation, and user adoption.
A poorly planned Salesforce data migration can create duplicate records, missing information, broken relationships, inaccurate reports, and operational delays. On the other hand, a structured Salesforce data migration checklist helps teams prepare, clean, map, test, and validate data before moving it to a new CRM environment.
This Salesforce data migration checklist covers 12 important phases of the migration process, including project planning, data assessment, data cleansing, field mapping, security checks, migration tool selection, sandbox testing, production migration, data validation, user acceptance testing (UAT), and go-live preparation.
Whether you are migrating from a legacy system or implementing Salesforce for the first time, this checklist provides a practical roadmap to help ensure a smooth, accurate, and successful data migration.
Why You Need a Salesforce Data Migration Checklist
A Salesforce data migration checklist ensures every critical task is completed before transferring business information into Salesforce. Data migration is more than simply importing records. It involves analyzing existing data, improving data quality, designing the correct structure, and ensuring Salesforce functions properly after migration.
Businesses often underestimate the complexity of CRM migration because existing data may contain years of outdated records, inconsistent formats, duplicate contacts, incomplete fields, and disconnected relationships.
A detailed checklist helps prevent these issues and creates a smoother Salesforce migration experience.
Benefits of Using a Salesforce Migration Checklist
Prevent Duplicate Records: Duplicate accounts, contacts, and leads can negatively affect sales operations and reporting. A migration checklist helps identify duplicate data before importing records into Salesforce.
Reduce Migration Errors: Planning each migration phase reduces failed imports, incorrect field mapping, missing relationships, and technical issues.
Protect Data Quality: Cleaning and validating data before migration improves CRM accuracy and ensures teams can trust Salesforce information.
Avoid Business Disruption: A structured migration plan reduces downtime and allows teams to continue business operations during the transition.
Improve User Adoption: When users receive clean, organized, and accurate data, they are more likely to adopt Salesforce successfully.
Speed Up Salesforce Implementation: A prepared migration process helps implementation teams complete Salesforce configuration and deployment faster.
Salesforce Data Migration Checklist
Phase 1 — Project Planning Checklist
Before migrating data to Salesforce, define clear goals, responsibilities, and timelines. Proper planning creates a strong foundation for a successful CRM migration.
Checklist
Define migration goals: Identify why you are migrating data. Common goals include improving reporting, replacing legacy systems, consolidating databases, and improving sales and customer management processes.
Identify source systems: Document all systems containing business data. Common Salesforce migration sources include HubSpot CRM, Zoho CRM, Microsoft Dynamics, Pipedrive, Excel, and Google Sheets.
Decide what data should be migrated: Identify the business data that needs to move into Salesforce, such as Accounts, Contacts, Opportunities, Leads, Activities, Files, and historical records.
Freeze unnecessary data changes: Limit major changes in the existing system before migration to prevent inconsistencies between source data and Salesforce.
Assign a project owner: Choose a person responsible for migration coordination, approvals, communication, and decision-making.
Create a migration timeline: Define key milestones, testing periods, migration dates, and post-launch support activities.
Identify stakeholders: Include Salesforce administrators, sales teams, marketing teams, customer service teams, IT departments, and management.
Phase 2 — Data Assessment Checklist
Before moving data into Salesforce, analyze your existing information. Data assessment helps identify what should be migrated, improved, archived, or removed.
Checklist
Review Accounts: Analyze company records and identify important customer, partner, and business account information.
Review Contacts: Check customer contacts, decision-makers, communication history, and relationship information.
Review Leads: Identify active leads that should be transferred into Salesforce.
Review Opportunities: Analyze sales pipeline records, deal stages, revenue information, and historical opportunities.
Review Activities: Review tasks, calls, meetings, emails, and customer interactions.
Review Attachments: Identify documents, contracts, images, and files that need migration.
Review Notes: Check important customer notes and internal communication records.
Review Files: Identify Salesforce-compatible files that should be transferred.
Identify duplicate records: Find repeated accounts, contacts, and leads before migration.
Identify missing values: Review incomplete fields that may affect Salesforce functionality.
Check inactive records: Determine whether old customers, leads, or contacts should be migrated.
Archive outdated data: Remove unnecessary historical information to keep Salesforce clean.
Review record ownership: Verify record ownership before migration to maintain accurate access and accountability.
Phase 3 — Data Cleansing Checklist
Data cleansing is one of the most important parts of Salesforce migration. Importing poor-quality data into Salesforce can create long-term problems for reporting, automation, and customer management.
Checklist
Remove duplicates: Merge repeated customer and company records before migration.
Standardize phone numbers: Use consistent formats for phone numbers across all records.
Standardize addresses: Ensure addresses follow a uniform structure.
Standardize country and state values: Match location information with Salesforce field formats.
Correct invalid email addresses: Remove incorrect or outdated email information.
Remove inactive contacts: Delete or archive contacts that no longer provide business value.
Delete unnecessary fields: Remove unused information that does not support Salesforce processes.
Merge duplicate companies: Combine duplicate account records into accurate profiles.
Fix incomplete records: Complete missing information wherever possible.
Validate mandatory fields: Ensure all required Salesforce fields contain accurate values before importing.
Phase 4 — Salesforce Field Mapping Checklist
Field mapping determines how information from your existing system matches Salesforce objects and fields. Incorrect mapping can result in lost information, inaccurate reporting, and broken automation.
Checklist
Map source fields to Salesforce fields: Create a detailed mapping document showing where each existing field will be transferred.
Identify custom objects: Determine whether your business requires custom Salesforce objects.
Identify custom fields: Review existing fields and decide which Salesforce custom fields are needed.
Define record ownership: Assign ownership rules for Accounts, Contacts, Leads, and Opportunities.
Map picklist values: Ensure existing dropdown values match Salesforce picklist options.
Configure lookup relationships: Maintain connections between related records.
Verify parent-child relationships: Check account hierarchies and related records.
Review multi-currency configuration (if applicable): Verify currency fields, exchange rates, and corporate currency settings are mapped correctly.
Review potential data skew: Identify objects with a large number of child records under a single parent or owner to prevent performance issues.
Document the mapping sheet: Maintain complete migration documentation for future maintenance.
Phase 5 — Security & Compliance Checklist
Protecting customer and business data is essential during Salesforce migration. Security planning helps ensure information remains protected throughout the migration process.
Checklist
Review user permissions: Check which users should have access to Salesforce records.
Validate field-level security: Ensure sensitive fields are visible only to authorized users.
Verify sharing rules: Review Salesforce sharing settings.
Remove sensitive data if required: Delete unnecessary confidential information before migration.
Review GDPR compliance: Ensure customer information complies with European data protection requirements.
Review CCPA compliance: Verify privacy requirements for California customer data.
Encrypt sensitive information: Apply encryption where required.
Verify audit requirements: Ensure migration activities can be tracked and reviewed.
Phase 6 — Migration Tool Checklist
Selecting the right Salesforce migration tool depends on your data volume, migration complexity, and integration requirements.
Checklist
Select a migration tool: Choose the appropriate migration method based on business requirements.
Salesforce Data Import Wizard: Suitable for simple imports with smaller datasets.
Data Loader: Recommended for larger Salesforce data migration projects.
ETL tools: Enterprise migrations may require tools such as Informatica, MuleSoft, or Talend.
API integration: Use APIs for complex system integrations and automated migration processes.
Backup source data: Create a complete backup before migration.
Backup Salesforce org: Protect Salesforce configuration and existing records.
Verify API limits: Check Salesforce API usage before running large migrations.
Phase 7 — Backup and Rollback Preparation Checklist
Before migrating data into Salesforce, prepare a backup and rollback strategy to protect your business from unexpected migration failures. If critical issues are discovered after deployment, execute the rollback plan immediately to restore Salesforce to a stable state.
Backup Preparation Checklist
Export source CRM backup: Create a complete backup of your existing CRM or database before migration.
Backup Salesforce records: Export existing Salesforce records to protect production data.
Export standard and custom objects: Back up all objects using Salesforce Data Export or Data Loader.
Backup files and attachments: Preserve documents, attachments, notes, and files.
Backup Salesforce metadata: Save custom objects, custom fields, validation rules, Flows, Apex Triggers, page layouts, profiles, and permission sets.
Record object counts: Document record counts for each object to validate migration accuracy.
Store backups securely: Save backup files in a secure, version-controlled location.
Verify backup restoration: Test restoring backups in a Salesforce Sandbox before production migration.
Rollback Preparation Checklist
Create a rollback plan: Document the complete rollback process before production migration.
Define rollback criteria: Identify the conditions that require reverting the migration.
Assign a rollback owner: Designate responsible team members to execute the rollback.
Document recovery steps: Prepare step-by-step instructions to restore Salesforce to its previous state.
Define the Recovery Time Objective (RTO): Establish the maximum acceptable downtime.
Schedule the migration window: Perform migration during a low-business-impact maintenance period.
Notify stakeholders: Communicate the migration schedule, expected downtime, and rollback procedures in advance.
Verify administrator access: Ensure administrators have the permissions required to restore data and configurations.
Prepare a communication plan: Define how users will be informed if a rollback is initiated.
Phase 8 — Sandbox Testing Checklist
Never test a Salesforce migration directly in a production environment. A Salesforce Sandbox allows your team to identify and resolve issues before they affect live users or business operations.
Checklist
Perform a trial migration: Complete a test migration using sample or full datasets.
Verify record counts: Compare migrated records with the original source data to ensure accuracy.
Check lookup relationships: Confirm that Account, Contact, Opportunity, and other record relationships are maintained correctly.
Validate automation: Test Salesforce workflows and automated business processes.
Test validation rules: Ensure imported records meet all Salesforce validation requirements.
Test Apex triggers: Verify that custom Apex code executes correctly after migration.
Test Flow automation: Confirm Salesforce Flows function as expected.
Verify reports: Ensure reports display complete and accurate data.
Verify dashboards: Check that dashboard metrics and business insights are accurate after migration.
💡 Real-World Migration Insight
Last month, we migrated 1.8 million records for a manufacturing client. Surprisingly, data volume wasn't the biggest challenge. During sandbox testing, we discovered 47 validation rules that were blocking record inserts. After auditing and temporarily disabling the affected rules, the migration completed successfully with zero data loss.
Phase 9 — User Acceptance Testing (UAT) Checklist
User Acceptance Testing (UAT) ensures Salesforce works according to real business requirements before it is deployed to production.
Checklist
Sales team testing: Verify lead management, opportunities, and customer information.
Service team testing: Check customer support processes.
Marketing testing: Validate campaigns, audience segmentation, and customer data.
Management approval: Confirm reports and dashboards meet business expectations.
Resolve issues: Fix any problems identified during testing.
Final sign-off: Obtain stakeholder approval before launching Salesforce.
Phase 10 — Production Migration Checklist
The production migration phase transfers the final approved data into the live Salesforce environment.
Checklist
Schedule the migration window: Choose a time that minimizes business disruption.
Notify stakeholders: Inform users about the migration schedule and expected changes.
Disable unnecessary automation: Temporarily pause workflows, flows, and processes that may interrupt data imports.
Disable duplicate rules if needed: Prevent migration failures caused by duplicate detection.
Import data: Execute the approved production migration plan.
Monitor migration logs: Track successful imports and failed records.
Resolve failed records: Correct errors and re-import unsuccessful records.
Re-enable automation: Restore Salesforce workflows, Flows, and other automated processes.
Phase 11 — Post-Migration Validation Checklist
After migration, validate that Salesforce contains complete, accurate, and fully functional business data.
Checklist
Verify total records: Compare Salesforce record counts with the original source system.
Compare source vs. Salesforce: Confirm all information transferred correctly.
Validate relationships: Verify Account, Contact, Opportunity, and custom object relationships.
Check reports: Ensure reports display accurate business information.
Verify dashboards: Review dashboard metrics and analytics.
Verify activities: Confirm tasks, events, emails, and communication history migrated successfully.
Check file attachments: Ensure important documents and files are available.
Validate custom objects: Review custom Salesforce objects and related data.
Review page layouts: Ensure users see the correct fields and layouts.
Verify active users: Confirm all required Salesforce users have been created and activated.
Validate user licenses: Ensure the correct Salesforce licenses are assigned.
Review profiles: Verify user profiles provide the appropriate level of access.
Validate roles: Confirm the Salesforce role hierarchy is configured correctly.
Verify permission sets: Ensure permission sets are assigned according to user responsibilities.
Review queues and public groups: Validate queues and public groups function as expected.
Check email deliverability: Ensure workflow, approval, and notification emails are sent successfully.
Test login access: Verify all users can log in and access the required Salesforce features.
Phase 12 — Go-Live Checklist
The Salesforce go-live stage officially transitions your organization to the new CRM environment.
Checklist
Activate integrations: Reconnect external applications and business systems.
Enable automation: Turn on Salesforce workflows, Flows, and automation processes.
Assign users: Confirm user roles, profiles, and permissions are correctly configured.
Verify login access: Ensure all employees can successfully access Salesforce.
Monitor system performance: Track Salesforce performance and system health after launch.
Track migration issues: Establish a process for reporting and resolving post-launch issues.
Create a support plan: Provide user training and ongoing Salesforce support.
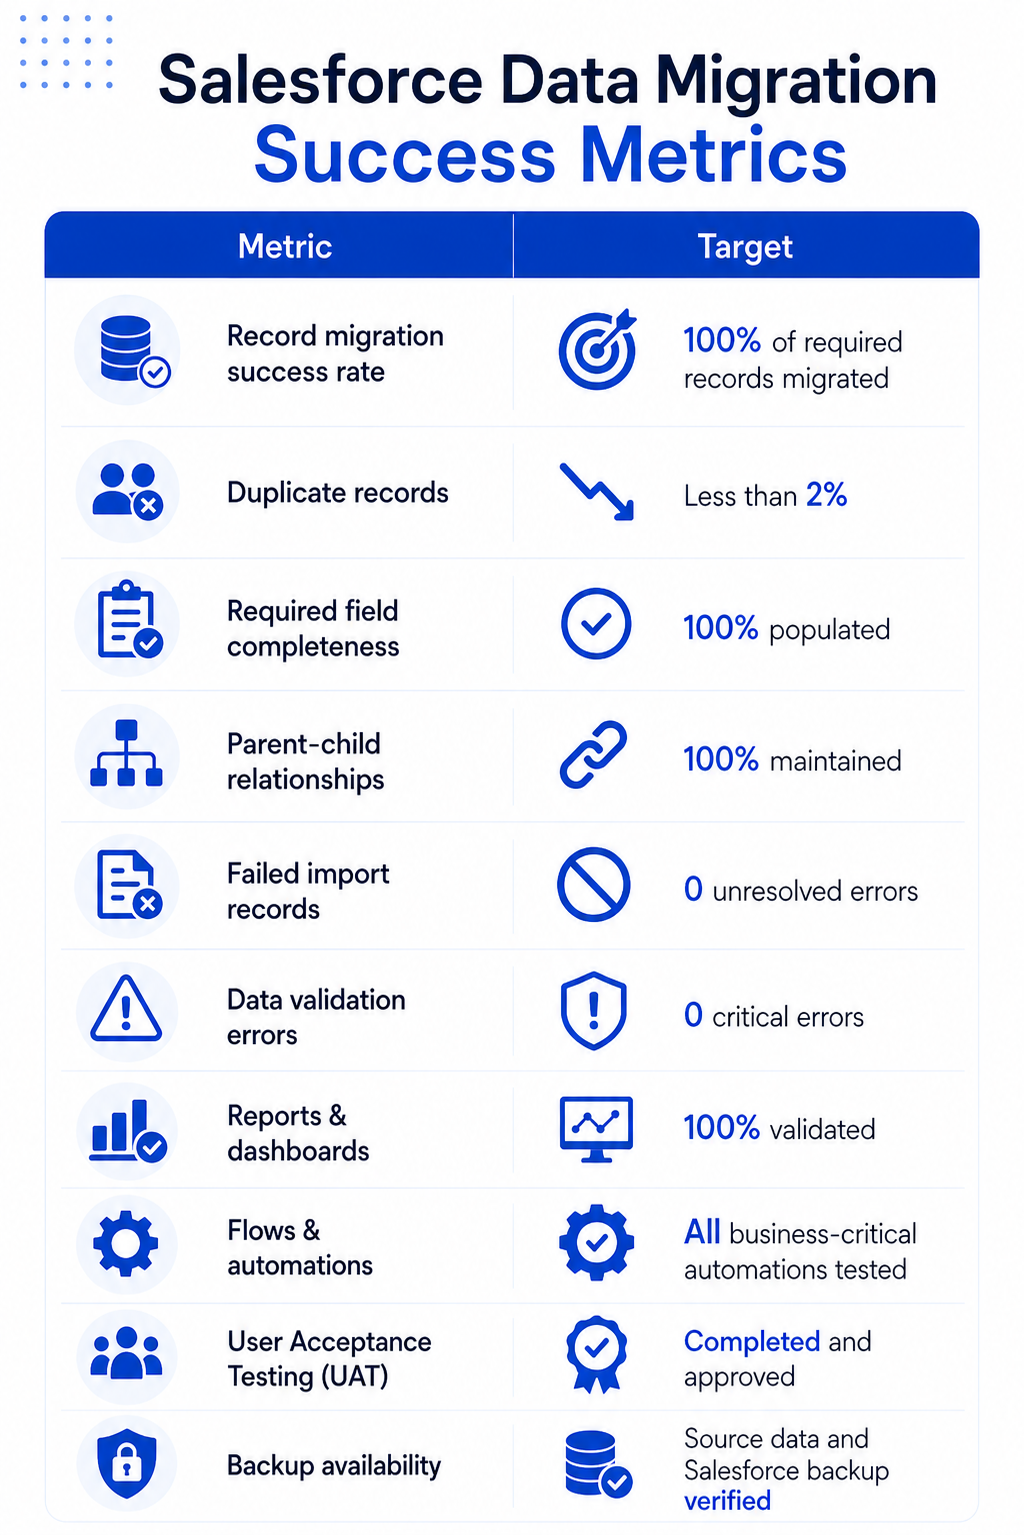
Salesforce Data Migration Success Metrics
A successful Salesforce data migration isn't measured only by whether the import completes successfully. It is measured by the quality, accuracy, and usability of the migrated data. Before signing off on your migration, aim to achieve the following benchmarks:
9 Salesforce Data Migration Mistakes We See Before Go-Live
After working on numerous Salesforce data migration projects, we've found that most migration issues aren't caused by Salesforce itself. They happen because important planning, testing, and validation steps are overlooked before go-live.
Here are the most common mistakes:
Leaving active automations and Apex triggers enabled
Not reviewing validation rules
Migrating poor-quality data
Ignoring field mapping
Skipping sandbox testing
Failing to validate the migration
Overlooking user access and permissions
Poor communication between project teams
Treating migration as the final step instead of an ongoing process.
Key Takeaway
Across our Salesforce migration projects, we've found that successful migrations depend far more on clean data, accurate field mapping, thorough sandbox testing, and careful validation than on the number of records being migrated.
How Does a Real Migration Project Work?
See how MV Clouds successfully migrated enterprise dashboards from Power BI to Tableau while preserving reporting accuracy and improving analytics adoption.
Measured Business Impact
50% Performance Gain – Improved dashboard rendering speed.
40% Faster Load Times – Reduced report generation and refresh cycles.
45% Better Data Clarity – Enhanced data visibility for faster executive decision-making.
Unified Reporting Environment – Consolidated multiple reports into centralized dashboards, creating a single source of truth across the organization.
Final Thoughts
A successful Salesforce data migration requires much more than importing records. It requires careful planning, data assessment, cleansing, field mapping, testing, security validation, and ongoing management.
Following this Salesforce Data Migration Checklist helps businesses reduce migration risks, improve CRM data quality, and build a Salesforce environment that supports better sales, marketing, and customer service operations.
Whether you're migrating from spreadsheets, another CRM, or a legacy database, following this checklist will help you reduce risks, preserve data integrity, and maximize the value of your Salesforce investment.
Frequently Asked Questions
1. What is Salesforce data migration?
Salesforce data migration is the process of transferring business information from existing systems into Salesforce. Data can be migrated from CRMs like HubSpot, Zoho CRM, Microsoft Dynamics, Pipedrive, SugarCRM, spreadsheets, or custom databases.
2. How long does Salesforce data migration take?
The timeline depends on data volume, system complexity, customization requirements, and data quality. Small migrations may take days, while enterprise Salesforce migrations can take several weeks or months.
3. What data can be migrated into Salesforce?
Businesses can migrate accounts, contacts, leads, opportunities, activities, notes, files, attachments, custom objects, and historical records.
4. Which tools are used for Salesforce data migration?
Common Salesforce migration tools include Salesforce Data Import Wizard, Data Loader, ETL platforms, API integrations, and third-party migration solutions.
5. Why is data cleansing important before Salesforce migration?
Data cleansing removes duplicates, fixes incorrect information, improves accuracy, and ensures Salesforce users work with reliable CRM data.
6. Can I migrate data from HubSpot or Microsoft Dynamics to Salesforce?
Yes. Salesforce supports migration from many CRM platforms, including HubSpot, Zoho CRM, Microsoft Dynamics, Pipedrive, SugarCRM, spreadsheets, and custom systems.
